The Ins and Outs of Attaching Tubes Safely and Accurately
Success in procedures like phlebotomy or intravenous therapy requires mastery of even basic techniques. While butterfly needles offer advantages in accessing fragile or superficial veins, safely inserting these thin devices into tubing demands care and control.
Whether you’re a seasoned nurse seeking a quick review or a new medical assistant still developing self-assurance, exploring the simple steps implemented by experienced colleagues could help bolster your skills.
Butterfly Needles: An Overview
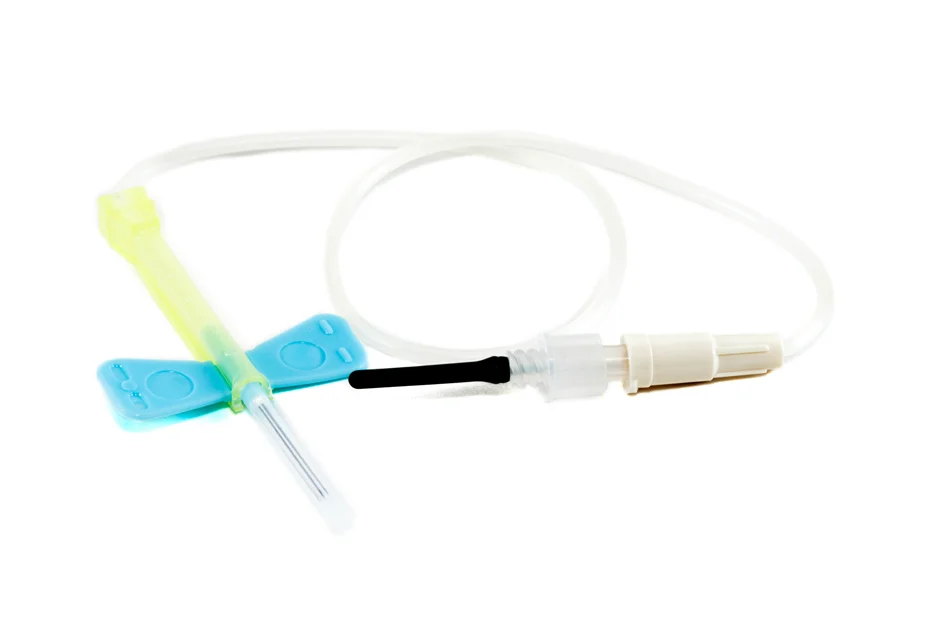
Butterfly needles are also known as winged infusion sets or scalp vein sets. They are comprised of several key components that make them well-suited for vascular access and tubing insertion. It’s important for medical professionals to understand each part and how they work together.
Transparent and Flexible Tubing
The tubing connected to the butterfly needle is transparent and flexible, allowing visualization of blood flow and minimizing blood exposure. This tubing may have a luer lock connector to attach a syringe.
Plastic Wings
They have plastic “wings” on either side of the hollow needle which help stabilize the needle during insertion and removal. The wings can also be used to secure the needle in place with tape.
Butterfly Needle Connectors
The tubing often has a luer lock connector that allows it to twist onto a syringe for blood collection or medication administration.
Actual Needle
Butterfly needles have a shorter, thinner gauge needle ranging from 18-27 gauge used for accessing veins. Sizes 21-23 gauge are most commonly used for blood draws.
Holder with Needle Attached
The hollow needle is attached to a usually plastic holder or hub that is secured to the patient’s skin along with the stabilizing plastic wings.
Types of Needles and Their Uses
There are two main types of butterfly needles:
| Type | Description |
| Standard Safety Devices | These feature a rigid plastic shield that automatically covers the sharp needle tip after use. Also called a white safety shield. |
| Push Button Safety Devices | With these, manually depressing a plastic button exposes the needle tip, and releasing it retracts and shields the tip. |
Butterfly needles have shorter needles with thinner gauges, ranging from sizes 18 to 27, with 21 or 23 gauges being the most commonly used for blood draw. The higher the gauge number, the thinner the diameter of the needle.
Uses of Butterfly Needles
Common uses of butterfly needles include:
- Venous access for blood draws: Suitable for small, fragile, or superficial veins. These makes them an ideal tool for infants, children, the elderly, and those with difficult access sites.
- Administering fluids and medications intravenously: They are used for intravenous (IV) therapy, and the flexible tubing and winged infusion set allow for precise placement and angle insertion
- Patients with shallow or thin veins: They are beneficial for “difficult sticks” with rolling or deep-set veins. Butterfly needles allow venipuncture of thin or fragile veins, such as those found in the hand or scalp.
- Patients who are difficult to access: They are also useful for patients who are afraid of needles or have a history of delicate veins.
Preparing for the Procedure

Proper hand hygiene and disinfection techniques are important when inserting a butterfly needle. Here are some steps that you should remember regarding cleanliness and safety.
1. Cleanliness and Safety
Keep cleanliness by washing hands with soap and water when visibly dirty or contaminated with blood or body fluids, before eating, or after using the toilet. The use of a commercial foaming hand wash product or a hand sanitizer before and after each patient collection is also advised.
Before and after each procedure, make sure to clean the working surface, chairs, counters, and walls to remove any sign of blood contamination.
For your safety, make sure to follow these steps:
| Instructions |
| 1. Wear well-fitting, non-sterile gloves when taking blood. |
| 2. Use clean, non-sterile examination gloves in multiple sizes. |
| 3. Use individually packaged 70% isopropyl alcohol wipes for disinfection. Wipe the site in a circular motion until dry. |
| 4. Use a clean gauze pad with 70% isopropyl alcohol solution or a commercially prepared alcohol pad to cleanse the site with friction. |
| 5. Wear personal protective equipment (PPE) at all times, such as gowns, gloves, and face masks. |
| 6. Change gloves between patient collections. |
| 7. Dispose of needles and hubs in an appropriate ‘sharps’ container as one unit. |
| 8. Transport laboratory samples in labeled, washable containers. |
2. Selection of the Correct Needle Size
When selecting a butterfly needle size for phlebotomy, consider several crucial factors:
- Blood Cells: The size of red blood cells needs to be accounted for to avoid cell damage or clotting during withdrawal.
- Blood Flow: Adequate vein diameter and flow are needed to efficiently and swiftly draw the required blood volume without collapsing the vein.
- Vein Size: Palpate the vein and visually inspect its depth, diameter, variability, and integrity to choose a needle gauge that narrowly matches the vein.
Some general tips for matching needle to vein include:
| Needle Gauge | Patient Type and Vein Condition |
| 21 gauge | Used on adults with plump veins |
| 22 gauge | Used on smaller veins |
| 23 gauge | Used on small and thin veins |
| 24 or 25 gauge | Used on patients with difficult veins, including neonatal/pediatric, geriatric, oncology, and burn patients |
Setting up Necessary Equipment
To set up the necessary equipment for a phlebotomy procedure:
Vacuum Tube
- Select the properly labeled tube based on the required tests. Inspect for cracks or leaks before securing the holder.
Tube Holder
- Attach the holder to the table with the needle insertion site up and away from the body. Load the vacuum tube into the holder so it will not fall out during the draw.
Sharps Container
- Place a puncture-proof sharps bin within easy reach on a padded surface. Ensure the lid secures tightly and will not open during disposal
Biohazard Waste Basket
- Line a puncture-resistant container with a biohazard bag inside. Position near the work area to drop contaminated items immediately.
Additional supplies to prepare:
- Isopropyl alcohol swabs within reach for site cleansing.
- Gauze squares that are accessible for pressure after the draw.
- Laboratory requisition or identification forms.
Inserting Tubes into the Needle
Proper attachment of tubes to butterfly needles allows for efficient blood draw procedures. Follow these steps to insert tubes:
| Step | Instruction |
| 1 | Remove the butterfly needle from its sterile packaging. This exposes the needle and attached tubing for subsequent steps. |
| 2 | Straighten out the tubing completely and attach the Luer adapter or valve to a fresh tube holder. The tube holder will securely hold collection tubes as they are filled. |
| 3 | Connect the needle’s tubing to the other end of the flow control on your tubing set. Push the tubing snugly onto the connector to form a tight seal. |
| 4 | Prime the line by pushing the syringe plunger until the fluid from the syringe fills the needle tubing and any air is expelled. This ensures smooth blood flow into tubes. |
| 5 | Once primed, the butterfly needle is fully prepared to insert into a vein for venipuncture while fluidly attached to tube collection systems. Proceed with identification of the vein access site and skin cleansing before proceeding to the blood draw steps. Proper pre-insertion setup eliminates disruptions during the medical procedure. |
Tips for Accessing Difficult Veins
- Apply a warm pack or towel to the area to increase blood flow and vein visibility.
- Have the patient lower their arm to utilize gravity and encourage blood pooling in the veins.
- Gently massage over potential sites to help raise identifiable surface veins.
- Applying a tourniquet above the site can cause veins to engorge and stand out more clearly.
- Feel along the surface to find deeper-lying veins not visible to the eye.
- If veins remain elusive, seek a colleague’s help to locate and access a suitable vein.
- Use a vein finder which employs infrared light to visually detect subsurface veins through the skin.
Inserting the Butterfly Needle
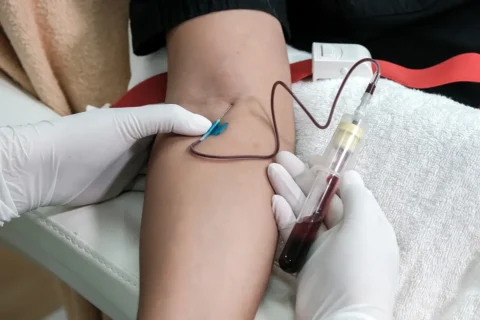
It’s time to carefully insert the butterfly needle into the selected vein. The proper technique here is key to a smooth blood draw. Gently but firmly hold the needle holder between your thumb and forefinger, oriented at a 15-30 degree angle in line with the vein – an accurate angle of insertion.
Slowly advance the needle tip into the skin, feeling for the cushiony pop as it slips into the vein. Then pause to see that flash of bright red blood which confirms the needle is properly placed inside the vein. A flush of blood may also be absent, so don’t assume the needle is not inside if no flash appears.
Drawing Blood With Ease
Now that the needle is inserted, it’s time to collect your blood samples. Attach the first vacutainer tube to the hub or holder with a gentle push. This creates a seal and allows the vacuum inside to efficiently draw blood into the tube.
Watch the tube fill – you’re looking for it to draw the exact amount specified by your lab based on the tests ordered. Different blood amounts are needed for blood samples for tests, blood cultures, and blood bank testing.
Risks and Considerations
As with any medical procedure involving sharps, there are certain risks and patient factors to consider when performing venipuncture.
- Risk of infection: Following a clean technique is critical to preventing transmission of bloodborne pathogens like hepatitis and HIV between patient and phlebotomist.
- Tissue damage or needlestick: Using the appropriate butterfly needle gauge and inserting at the proper angle minimizes trauma and the risk of accidental sticks during disposal.
- Patient comfort: Explain what to expect and distract nervous patients if needed. Go slowly, especially with children, and ensure the tourniquet is not overly tight. Applying warm compresses beforehand can ease discomfort.
- Skin condition: Avoid puncturing swollen, infected, or inflamed skin, as this increases pain and risk of contamination. Select an intact alternate vein if the primary site is unsuitable.
- Considerations: Assess any patient medications, implants like port-a-caths, or conditions like brittle veins that require special precautions or technique modifications. Communicate concerns to the provider as needed.
Conclusion
After reviewing the steps for inserting a butterfly needle into tubes, it is clear that precise placement is important to minimize discomfort for patients and maximize the chances of a successful draw. When inserting the needle, taking time to accurately locate the vein, stabilize it with your non-dominant hand, and enter at just the right angle can make all the difference.
Adhering to best practices for venipuncture, from preparing the supplies to applying pressure after removing the needle, helps improve the experience for all involved.
Take Your Butterfly Needle Needs to Face Med Store
To stay well-stocked with high-quality butterfly needles and tubes for your practice, you can reliably turn to Face Med Store. As a leading supplier of medical products for cosmetic and wellness procedures, Face Med Store carries all the top brands in safe and hypoallergenic materials.
We make buying medical supplies stress-free so you can focus on your patients. Place an order for your butterfly needles today!